If your oven’s gone cold right before dinner and you’re wondering if you can swap out the heating element yourself—here’s something juicy: most people who try succeed, and it doesn’t take a fancy toolbox or wizard-level DIY skills. What trips most folks up is not the technical bit, but little things like not unplugging the appliance (whoops), or getting the wrong replacement part because every oven seems to have its own secret code. Swapping your own oven element is more like changing a stubborn lightbulb than rewiring a spaceship, but don’t let anyone fool you—there are a couple of moments that feel way too dramatic for a regular Tuesday night.
How Oven Elements Work and Why They Fail
That hot coil at the bottom (and maybe top) of your oven is your element—it’s what turns cold metal into a pizza-baking paradise. These elements are made from nichrome wire, a nickel-chromium alloy that really does a number on electricity—it offers high resistance and lights up red-hot, which is exactly what you want for browning chips and crisping bacon. What a lot of people don’t know is, oven elements almost never wear out gently. Most of the time, one second you're roasting veg and the next—the element’s just done, often snapping or bursting with a tiny spectacle that drains all future heat from your oven.
If you’re unlucky, sometimes the failure’s more subtle: uneven heating, burnt spots on cakes, or that gasping wait for preheat to finish. These are your classic signs of a struggling element. According to a 2022 consumer appliance study, heating element failures account for more than 40% of common oven faults experienced within seven years of purchase. If you see blisters, dark spots, or warping on the element, that’s the oven’s version of waving a giant help-flag.
Most modern ovens use two elements: one for baking at the bottom, another for broiling at the top. Some fancy models sneak a circular element around the convection fan, making repairs less obvious but not impossible. Regardless of your setup, a failed element leaves your oven cooler than a fridge. What matters is, these things are built to plug in and unplug—manufacturers expect they’ll be replaced now and then. The only time you really have to worry is if you see signs of wiring damage or burnt connectors, which might be pointing to a bigger problem upstream in the circuitry.
What You Need to Replace an Oven Element
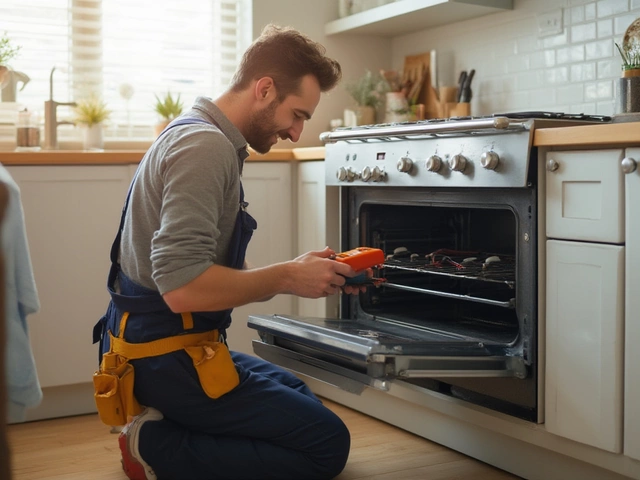
Tackling an oven element swap doesn’t require some sort of James Bond toolkit. Most jobs need just a Philips screwdriver and, if your oven is feeling difficult, maybe a pair of needle-nose pliers. The secret weapon? A phone with a decent camera. You want to snap a picture before things come apart, so when you’re staring at a tangle of wires after you’ve had a coffee break, you know where everything goes.
- Replacement element: Make sure it matches your oven’s model. Don’t eyeball it—use the serial number. Most brands keep a sticker inside the oven door frame. Online parts shops almost always have a search tool to help.
- Philips screwdriver
- Needle-nose pliers (in case wires are tight)
- Nut driver or small socket wrench set (optional—sometimes needed for certain bolts)
- Work gloves (elements can have sharp edges or baked-on grease patches)
- Camera or smartphone for reference photos
If you’re thinking about skipping the gloves, keep in mind that burnt-on splatters or sharp fins lurking under the element can surprise you. Always unplug the oven or turn off the circuit breaker—there’s no thrill worth a live wire. Data from the Office for National Statistics in the UK shows about 320 accidental injuries from electric cookers occur at home every year, often when appliances are live and being tinkered with.
And don’t forget: some ovens are wired directly into a high-voltage junction box and don’t have a simple wall plug. If yours is, you need to kill the power at the fuse board. Not sure? If the oven doesn’t slide out to reveal a plug, it’s probably hardwired.

Step-by-Step Guide: Replacing the Oven Element
Nothing stress-tests your patience like a screw lost in the gap behind an oven. Here’s how to avoid the classic pain points and get your new element seated safely:
- Unplug your oven or flip off the circuit at the breaker. Safety first, always.
- Open the oven door and take out the oven racks. This gives you space to work.
- Locate the faulty element. In most ovens, the lower bake element is attached with two screws or nuts at the back.
- Remove the mounting screws/nuts. With your screwdriver or socket set, carefully unscrew the fasteners holding the element in place.
- Gently pull the element toward you. About two or three inches is enough for the connectors to show. Most elements connect with simple slip-on spade connectors. Sometimes you’ll see wires attached with screws—just loosen those a bit.
- Take a photo extra here so you know exactly how the wires are connected.
- Disconnect the wires. Wiggle the connectors loose (needle-nose pliers can help if they’re snug, but don’t yank too hard).
- Remove the element. Now’s a great time to scrape away any gunk or debris that’s built up. This spot sees less daylight than your average attic.
- Connect your new element to the wires, matching the connections exactly to your earlier photo.
- Slide the element back in and secure it. Replace screws or nuts. Don’t over-tighten, but make sure they’re snug—loose elements can rattle and burn out early.
- Put oven racks back in and plug your oven back in (or turn on the breaker).
- Test the oven. Set it to bake and watch the magic—if your new element glows red and you feel heat, you’ve nailed it!
If the oven still doesn’t heat up, double-check your connections and the replacement part number. Sometimes new elements arrive faulty—a rare headache, but not unheard of. Most reputable suppliers will swap these out at no charge.
Common Mistakes and How to Avoid Them
You’d be surprised how many people skip the power-off step, assuming the oven is harmless. Another regular slip? Forgetting to match both the element’s shape and mounting bracket type to your oven model—it’s not just about size, but the exact points where it slots in.
Here are a few no-no’s, along with a quick comparison of DIY versus pro jobs (based on actual job quotes and timing):
| Method | Average Cost (2024, UK) | Time Required |
|---|---|---|
| DIY Repair | £12-£35 (element only) | 20-60 minutes (depends on model) |
| Call-out Engineer | £90-£150 (includes part & callout fee) | 30-90 minutes (plus possible wait for parts) |
- Ordering the wrong part—double check model numbers before you click 'buy.'
- Forcing connectors—elements should attach smoothly. If you’re fighting, something’s off.
- Dropping screws behind the back panel—a magnet on a string works wonders if this happens.
- Not cleaning the area—leftover residue can burn and smoke the first time you heat up.
- Ignoring any signs of melted wires or terminal blocks—these point to bigger electrical problems. If you see them, stop and call a pro.
One clever tip: keep a magnet tray nearby for holding tiny screws, so nothing rolls away mid-job. And always test the new element before putting every rack and pan back in—catch any problem now, not when you’ve loaded up Sunday roast.

When to DIY and When to Call the Pros
Fixing an oven element is one of those home jobs that lots of people pull off, but it’s not always a slam dunk. Here’s when doing it yourself makes sense, and when to hand it off:
- DIY is a good bet if you see the element clearly, and it connects from inside the oven without yanking the whole cooker out of its nook.
- If your oven is built into cabinetry especially tightly—or hardwired behind a cupboard wall—it might be worth calling the professionals just to save time and strain.
- If anything looks burned or melted behind the panel, this can mean a short circuit or a deeper wiring problem. Get an electrician in.
- Gas ovens can have electric elements too, but this adds a twist—gas supply lines are nothing to play with if you’re new to repairs.
- If you’re renting and your contract says 'no unauthorised repairs,' check with your landlord or agent first—better safe than losing a deposit.
The upside? Most electric oven elements are designed to be replaced by regular folks, not just appliance engineers. Manufacturers even publish official 'how to' guides, because replacing oven elements is easily one of the most common fixes. As for the cost: doing it yourself usually runs less than a third of what it costs to book an engineer, not to mention skipping the waiting time.
Replacement elements are everywhere—big hardware chains, appliance stores, and specialist websites. Shipping is often fast, but if you’ve got a rare brand (think older European models or off-label imports), order with care and double check compatibility.
Keep your oven’s instruction manual handy—lots of brands tuck a wiring diagram in the back. Lost your booklet? Nearly every manual is downloadable online, just punch in your oven model and “manual.”
In the end, most people fixing their own oven element say it feels satisfying and empowering. The moments of stress—the lost screw or stubborn connector—are usually just speed bumps, and the payoff (homemade lasagna back on the menu!) makes it worthwhile. If you’re careful and well-prepped, swapping out a dead element is about as risky as assembling a piece of flat-pack furniture. Just don’t forget to share that dinner—you earned it.