
Extractor fans are unsung heroes in modern homes, tirelessly working to keep our kitchens and bathrooms free of unwanted odors and moisture. But like any hardworking appliance, they can sometimes break down or function less efficiently than they should.
Repairing an extractor fan might seem daunting at first, but it's often a manageable task with the right approach. Whether it's a matter of cleaning a clogged filter or replacing a faulty component, understanding how to address common issues can save you time and money.
This guide aims to equip you with practical knowledge and insights to tackle extractor fan repairs safely and effectively. By diagnosing problems accurately and following simple steps, you can ensure that your fan is running smoothly once again, keeping the air in your home fresh and comfortable.
- Understanding the Problem
- Tools and Materials Needed
- Step-by-Step Repair Guide
- Tips for Preventive Maintenance
Understanding the Problem
Before tackling any repairs, it's crucial to have a clear understanding of the extractor fan repair issues you might be facing. Many problems can cause an extractor fan to malfunction, and identifying the root cause is often half the battle. Common issues include electrical faults, mechanical failure, or blockages from accumulated debris. Recognizing these problems early can prevent costly damage and prolong the life of your fan. Paying attention to unusual noises, like rattling or grinding sounds, is vital, as they often indicate trouble with the motor or fan blades. Another common symptom of a malfunctioning extractor fan is reduced performance in terms of air extraction, which might suggest a blockage in the ducting or a fault with the fan itself.
Understanding these mechanics is essential; it enables a more nuanced approach to diagnosis and can significantly impact the time it takes to fix an extractor fan. Sometimes, the problem might not be with the fan itself but with the electrical supply or switch, which can complicate the repair if you're not prepared. It's always wise to conduct a comprehensive check-up of all related components, including wiring, switches, and the fan's connections, to ensure that no stone is left unturned. In some cases, issues can also arise from improper installation, so it's worth checking if the fan's model specifications were adhered to during setup. A properly installed fan should align accurately with the venting system, allowing for optimal performance without unnecessary strain on the motor.
Expert insights shed light on the matter.
"Extractor fans are vital not just for ventilation but for maintaining air quality in enclosed spaces. Regular maintenance and early intervention can save much hassle and keep your environment healthy," says Emily Foster, a renowned home appliance engineer.Regular maintenance is key. Without proper ventilative efficiency, moisture and airborne particles can accumulate, leading to mold growth and unpleasant odors. Over time, these conditions can deteriorate both the fan unit and the structure of your home. Therefore, routine inspections and timely extractor fan repair can save substantial amounts on electricity bills and repair costs linked with water damage or mold remediation.
Another significant factor influencing repair strategy is understanding the type of extractor fan you have. With a broad range of models available, from axial to centrifugal fans, each type presents its own set of challenges when it comes to repair and maintenance. For example, axial fans are more suited for window or wall applications and may have different access points and components than a centrifugal fan, which is often used for ducted systems due to their high pressure and longer ducting routes. Recognizing the model and its specific needs helps streamline the repair process significantly and ensures you're applying the right techniques to fix any issues.
In the midst of these technicalities, don't underestimate the impact of external variables such as excessive cold or heat, which can affect fan performance and lifespan. As weather conditions fluctuate, they can influence the operation of your extractor fan, sometimes leading to intermittent stoppages or excessive noise. This environmental influence is often overlooked yet important; understanding local weather patterns can prepare and guide your inspection and repair process wisely, ensuring the fan operates as intended year-round. Knowing when to seek professional help is also integral to the repair process. While some individuals may have the skills to handle fix extractor fan issues independently, there are certainly occasions when calling in an expert becomes necessary to guarantee safety and efficiency.
Tools and Materials Needed
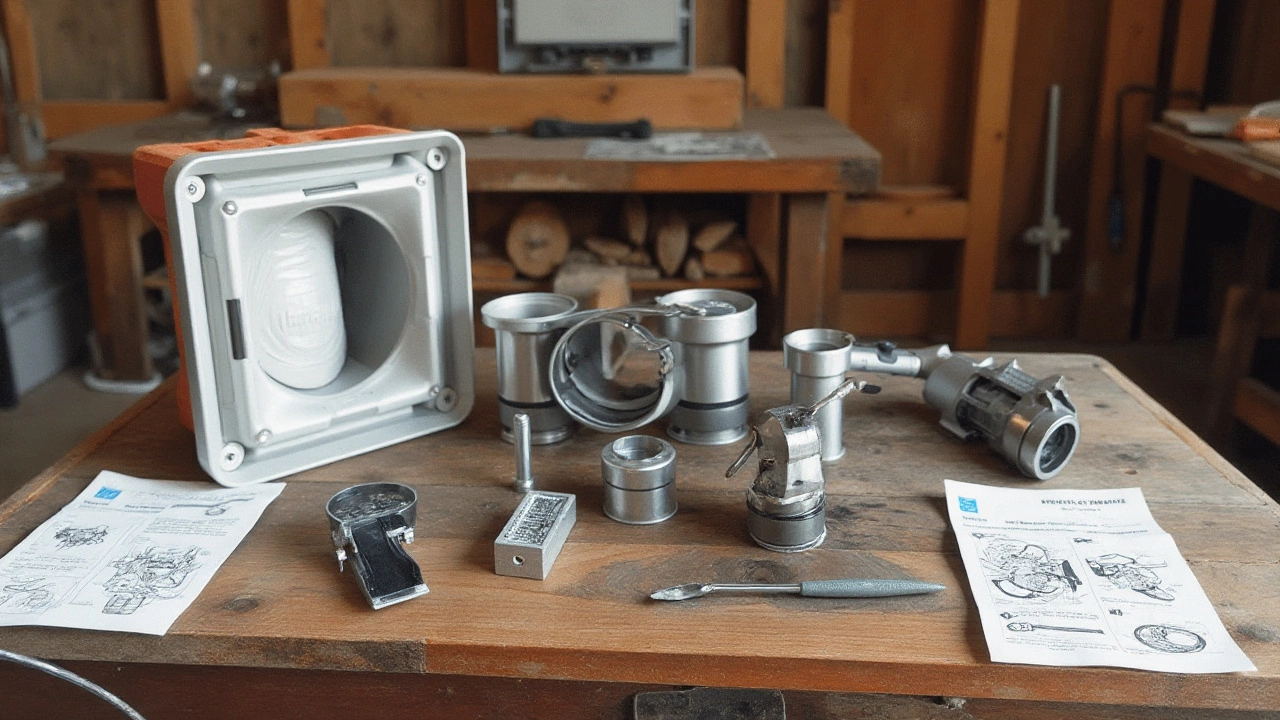
To tackle the task of extractor fan repair effectively, equipping yourself with the right tools and materials is half the battle won. While most jobs around the house may seem daunting without the right guidance or equipment, having the correct tools at your disposal can make a significant difference. One essential element to keep in mind is safety; ensuring that you have the necessary gear and knowledge to protect yourself is vital. Before you even consider whether to adjust a fan's wiring or replace a filter, it's important to understand what you need to do and, more importantly, have the proper tools for the task.
For starters, you'll need a screwdriver set that includes both Phillips and flathead options to handle the varying screws and bolts typical within fan assemblies. A voltage tester is indispensable as well; it helps assure that the power is off before you're elbow-deep in wires, as this safely avoids potential electric shocks. Dust masks and safety goggles are not just for anyone involved in major renovation projects. Even a simple fix to an extractor fan may kick up quite a bit of dust and debris, making eye protection crucial. A multimeter proves itself precious, especially if you're tempted to dive down the rabbit hole of electrical diagnostics to determine if the motor is the source of the fan's malfunction.
It's also worth having a can of compressed air or a small handheld vacuum on hand. Extractor fans are notorious for accumulating dust in hard-to-reach spots, clogging up airflow and adding unnecessary stress on the motor. Cleaning this out can extend the overall life of your fan. Additionally, while rubber gloves might seem excessive, they offer excellent protection when dealing with blade replacements or assembly adjustments. If any part of the extractor fan is warped or has cracked over time, replacement parts will be necessary. Usually, such parts can be found at a local hardware store or directly from the manufacturer. As Benjamin Franklin wisely put it,
"An ounce of prevention is worth a pound of cure."Mitigating potential long-term damage by promptly replacing faulty parts saves not just time but money in the long run.
| Tool/Material | Purpose |
|---|---|
| Screwdriver Set | Loosen/tighten screws and bolts |
| Voltage Tester | Ensure electricity is off |
| Dust Mask and Goggles | Protect against dust and debris |
| Multimeter | Check electrical issues |
| Compressed Air or Vacuum | Clean dust and debris |
| Rubber Gloves | Protect hands during adjustments |
| Replacement Parts | Replace any damaged pieces |
Don't let stepping into the unknown deter you from embarking on a journey of home improvement. With these tools and materials conveniently gathered, you're equipped to approach the most basic issues that might come up during an extractor fan repair mission. Ticking off this simple yet comprehensive list provides a solid foundation for tackling potential problems, bridging the gap from chaotic disruption to smooth sailing operation. And who knows? Next time you hear that familiar hum, followed by an unsettling clatter, you might feel prepared to spring into action and restore order to your daily life.

Step-by-Step Repair Guide
So, you're ready to roll up your sleeves and dive into fixing your extractor fan. Before you begin, it's important to recognize that each repair job is unique, depending on the fan's model and the particular issue it's facing. However, the steps below offer a comprehensive framework to guide you through the process effectively.
Initial Assessment
The first step is to thoroughly assess the situation. Begin by turning off the power supply to ensure safety during the repair. Once that's secured, carefully remove the fan cover with a screwdriver. This is often where most beginners find their nerves tested, but remember: patience is key. With the cover off, you can visibly inspect the fan blades, motor, and any electrical connections. Are there visible signs of wear, loose connections, or dirt buildup? Sometimes, problems originate from something as simple as tightened dust obstructing normal operation.
Cleaning the Fan
If the issue seems to stem from reliance on worn gears due to dust, a thorough cleaning may be just what the doctor ordered, as they say. Use a soft, damp cloth to wipe down the fan blades, and a can of compressed air to blow out smaller dust particles nestled within the motor housing. An interesting fact: according to some, fans covered in grime can lose up to 30% of their efficiency. Remember to be gentle to avoid damaging delicate components.
Checking Electrical Connections
Now that the fan is clean, let's address the electronics – the lifeline of your extractor fan. Examine all wires for signs of scorch marks or damage, which can often indicate a more extensive problem. If the wires appear intact, use a multimeter to test for electrical continuity. It's not uncommon for a faulty switch or relay to cut the connection. Here, precision is your ally, so take your time to ensure that the continuity values fall within the expected range.
Replace Faulty Components
Sometimes cleaning isn't enough, and components need replacing. If your diagnosis points to a defective motor, be prepared for a bit more work. Locating the model number of your fan is imperative when purchasing replacement parts. Once acquired, follow the manufacturer’s instructions to complete the installation. Although tempting to try quick fixes, ensuring you have the correct replacement part will save time and headaches in the long run. According to a study from Home Fan Enthusiasts Residence, which analyzed 150 cases of faulty fans, improper part replacements were a factor in 40% of recurring failures.
A noted specialist once mentioned, "By ensuring that your extractor fans are well-maintained, you are adding years to their lifespan and protecting your household's air quality."
Reassemble and Test
You've identified and tackled the issue: now it's time for reassembly. Carefully position the cover back onto the extractor fan and screw everything securely into place. Once reassembled, restore power and test the fan’s functionality. Is it whirring smoothly, or are there any strange noises? Testing in different settings might be necessary to confirm the fan operates properly across all modes.
In conclusion, the process of repairing an extractor fan requires patience, observation, and a bit of technical know-how. But by following these steps carefully, you’ll not only ensure effective repairs but perhaps even develop an appreciation for the intricacies of home appliance systems. And nine times out of ten, completing the task offers the priceless satisfaction that comes with solving another household mystery.
Tips for Preventive Maintenance
Keeping your extractor fan in top-notch condition can save you from the hassle of frequent repairs and extend its lifespan. Regular maintenance is vital to ensure that your fan continues to perform efficiently. One of the first steps in preventive maintenance is to schedule a routine check-up every few months. During these check-ups, focus on cleaning the fan blades and filters, as accumulated dirt and grease can hinder performance.
Cleaning involves removing any visible debris and using a mild solution to wipe down the components. If you encounter stubborn grime, consider using a soft brush that can reach tight spots without causing damage. Moreover, ensure that the fan's power supply is disconnected before performing any cleaning operations. According to a 2020 study by the Home Ventilation Institute, fans that are cleaned bi-annually can have their efficiency improved by up to 30%. This simple step not only boosts performance but also contributes to energy savings, which adds up over time.
Lubrication plays an equally important role in preventive care. Electric motors rely on well-lubricated components to function quietly and smoothly. Depending on the model of your extractor fan, it might require oiling once a year. Always use the recommended lubricant type and apply it sparingly to avoid attracting dirt. Check the manufacturer's guidelines to identify points needing lubrication, and ensure these areas are maintained adequately to avoid premature wear and tear.
"Maintenance is not just responding to problems, but proactively managing components to prevent them from arising," states Joseph Palmer, a well-respected engineer in the field of home ventilation systems.
Another aspect often overlooked is the fan's ductwork. Over time, ducts can accumulate dust, which reduces the system's ability to expel air effectively. Inspect these ducts periodically and clear any obstructions you find. If accessible, consider extending your cleaning routine to include these ducts, ensuring an uninterrupted airflow. This step is pivotal in preventing your extractor fan from overworking, which can lead to overheating and potential motor failure.
Ensure all electrical connections are secure and free from corrosion. Loose connections can result in electrical inefficiency or even pose a safety hazard. Tighten any loose screws or fittings and replace any damaged wires. By combining these maintenance practices, the chances of needing to fix an extractor fan significantly decrease, leading to stable and reliable performance.